

HPC for deep learning guidebook
This guidebook accompanies the short video tutorial for the OU12 module. It contains all the scripts and examples that support the material and learning points in the video.
It assumes that you already have basic familiarity with the cluster, which you can learn about here: https://docs.hpc.cam.ac.uk/hpc/user-guide/quickstart.html
Tip 1: Quick experimentation, without using the head nodes
The HPC cluster has two classes of nodes: worker nodes and login (or head) nodes. Generally, it is not advisable to run any long-running or resource intensive scripts on these.
For testing and evaluating your scripts, the interactive running mode will provide near-instant access to the resource you need (including GPUs) on a worker-node for up to one hour.
For submitting a batch script, or for using the interactive terminal, the --qos flag will change the job priority to allow for testing.
sintr --qos=INTR [args] # For interactive shell
sbatch --qos=INTR [args] # To submit batch job
Tip 2: Don't duplicate your scripts. Use the same scripts for your machine and the cluster
Making copies of scripts, different versions for different experiments, and hard-coding lots of parameters is an easy way to make mistakes. As you add more and more scripts to your project, testing different configurations, the number of scripts that you need to update and maintain can become a problem.
Think back to separation of concerns principle. By separating out experiment configuration and platform-specific (e.g. laptop vs HPC cluster) behaviours, most of the headaches you'd expect to encounter can be mitigated. When you submit jobs to sbatch, the script file is just a bash script with some metadata in a comment block at the top. In principle, this should run on your machine in exactly the same way. In my experiments, I set platform specific behaviorus (cluster vs laptop), the project, and the configuration in separate files allowing for greater portability.

Specific configuration for the cluster may involve:
- Path to python executables / virtual environment
- Where to load data from
- Where to store results and log files
- Network port for DDP communication
Most of these, however, shouldn't be hard coded in your bash file. And if they are, relative paths and directories allow for greater portability.
Setting paths before submitting job
The Python path can be set using the $PATH environment variable which could be set in your ~/.bashrc file on the cluster at login. Or if you have a project-specific installation, this could be set in a shell script and used to configure the environment. Similarly, any working folders or data directories can be set as environment variables:
For example:
# project_setup.sh
#!/bin/bash
export PATH=$PATH:~/path/to/my/env
export DATA_DIR=~/rds/hpc-work/project_data
Then running the following when submitting jobs for your project.
source ./project_setup.sh
Unless set otherwise, SLURM will preserve your environment when running jobs meaning that any environment variables or paths that are set before submitting the job will be passed through. It is also possible to manually set environment variables with SLURM, but this can be a bit of a pain.
Passing arguments to sbatch
Where arguments can be passed to conventional bash scripts: the same behaviour can be used with sbatch. For example creating a bash script called 'test.sh'.
#!/bin/bash
echo $1
echo $2
And running it as bash test.sh hello world will output the following:
hello
world
Similarly, submitting the same bash script as a job with sbatch (assuming the accounting info, runtime, etc are provided), will output the same result. For example: sbatch [...args...] test.sh hello world. This allows you to easily switch different config files for experiments, or manually override parameters without having to duplicate your script.
Setting default behaviour within job script
Optional parametrs in bash can be configured to set default behaviours when environemnt variables of paths are not set. The same pattern ${VAR_NAME:-DEFAULT_VALUE} in bash can be used to set config when they are not explicitly set. In the first line, the first argument to the script is set to be the config file bash myscript.sh custom_config.json. If this is not set, the default value of config.json is used. The second example, the batch size is read from an environment variable: this might be useful when testing on a GPU with smaller memory than what is available on the cluster for example: BATCH_SIZE=4 bash myscript.sh.
CONFIG_FILE=${1:-config.json}
BATCH_SIZE=${BATCH_SIZE:-16}
Tip 3: Run end-to-end on a small dataset to identify errors early
Sometimes small changes in how data is loaded or pre-processed can cause failures that don't manifest until after training has finished (for example, not saving the weights file to the correct directory), wasting countless hours of both your time (waiting for results) as well as the resources on the cluster (such as quota, priority, or limits). It's essential to run the scripts end-to-end, including training and evaluation, on a small subset of the data before training on a large-dataset. To ensure that every experiment is tested, this should (ideally) be performed as part of your main bash or python script file.
The starting point is to make sure that things work locally before you even submit your job. Debugging on the cluster can be a bit of a pain, so if you can fix most of the faults locally before running your script most of the faults you’re likely to encounter on the cluster should be simple to diagnose and recover. Following tip #2 can help with this.
But, on the cluster, faults always happen when you least expect them.
They can occur in any part of your code: whether its running out of GPU memory, having a missing file, not being able to parse your dataset, checkpoints not saving, or being corrupted upon saving. These behaviours may be different on the cluster and it's important to make sure all aspects of the script work on the cluster before spending a lot of money / credit training on the full datasets.
There are two ways to check: editing your python code to test these functions, or simply doing a dry run with exactly the same code. Some libraries do some basic smoke tests with the first option, for example, performing an evaluation run with a sample of data before training. But this does not capture all aspects of the dataset. The second option is the easier: training and evaluating on a small sample of your data. A small sketch of the idea is provided below.
head -n 100 data/my_dataset.jsonl > data/sanity_check_data.jsonl
python train.py data/sanity_check_data.jsonl output/sanity_check
python evaluate.py data/sanity_check_data.jsonl output/sanity_check
python train.py data/my_dataset.jsonl output/full_model
Tip 4: Checking for failure
There's a number of ways your script can fail: whether its your script crashing or terminated by the scheduler (such as running out of time or being preempted). Its best pratice to listen for these events so that you can debug your script if it crashes, or resubmit the job if it runs out of time.
Regularly checkpointing helps you limit the damage of unscheduled termination of your job. There’s a lot of things on the cluster that may be outside of your control that that can go wrong too, such as running out of disk space or having the network file system go down. All of these can be quite disruptive and mean that if your script isn’t able to handle those events, you could lose a few hours of work and struggle to work out which jobs completed OK and which ones need to be resubmitted or re-run.
In other facilities, not at Cambridge, higher priority jobs submitted to the queue would cause low priority jobs to terminate. Right before conference deadlines, the last thing you’d want is to struggle to re-train your entire model. Being able to save to and load from checkpoints is a great timesaver that would allow you to re-submit your job and resume from where you left off, assuming your code allows for it.
Checking for crashes
There's a couple of easy ways to check whether your code finished successfully: the simplest is to check for a non-zero exist code in bash and logging it, and using it to mark your job as error. In linux, processes return a non-zero exit code if something went wrong. This is returned as a special environment variable denoted by a question mark which will be zero if the process was OK and something else otherwise.
ERROR_CODE=$?
if ! [ $ERROR_CODE == 0 ]
then
 echo "Non-zero exit code " $ERROR_CODE
 exit $ERROR_CODE
fi
The other option is to save a file after your script has completed everything it needs to (such as training or testing a model), with the results and checking to see if this file exists.
Listening for messages from the scheduler
The scheduler can terminate your job if it is running out of time. Sadly, on the HPC cluster at Cambridge, jobs have a fairly small time limit of 12 or 36 hours depending on the service level. Your script can be set up to listen for a message if it is about to be terminated and used to save a checkpoint or even requeue the job. These messages can be handled by your python code or by your bash script.
The scheduler can be configured to send a signal T seconds before your job runs out of time. This makes it really useful for making jobs which will run beyond the time limits that have been configured here at Cambridge. You can also manually send a signal with the scancel command too. The argument --signal XXX@TTT can be set to send signal 10 (SIGUSR1) 60 seconds before termination: --signal 10@60 so that your script can resubmit and also save the weights.
More information about handling signals in bash can be found here and more information about handling singals in Python can be found here.
Jobs can be resubmitted in bash by calling scontrol requeue $SLURM_JOB_ID.
Tip 5: Don't be greedy
For managing queue time, you need to choose the right service level and ask for the right resources.
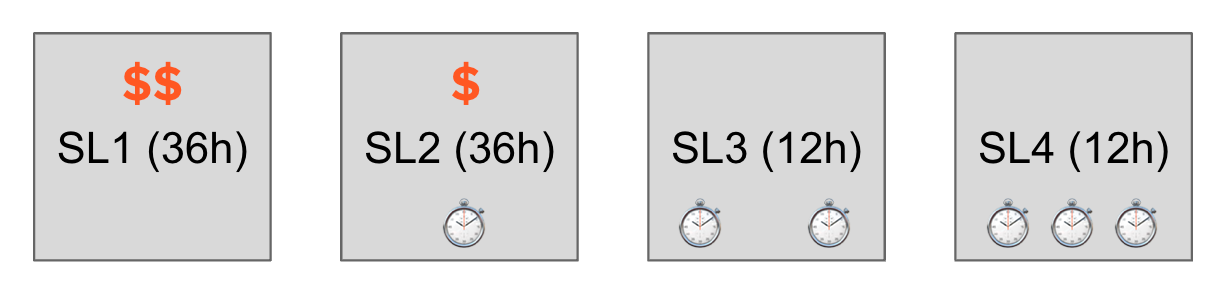
Most of the jobs you’ll submit will either be submitted as SL2 or SL3. SL3 is a free service level which offers a few thousand hours of HPC time per quarter. If you exceed this allowance, you get demoted to SL4 which has a lower priority. If you want a higher priority, you can pay a few pence per hour to use service level 2. SL2 jobs allow more resources and longer runtimes. If you exceed the limits set by the cluster, your job may not be accepted, or can wait forever.
Even though SL2 allows jobs to run up to 36 hours. Smaller jobs can be better. The scheduler will have to reserve time for the entire length of your job. If you choose a shorter runtime, the scheduler will try and fit these smaller jobs in and around larger jobs. If you request only what you need, your job may be run more quickly as the scheduler backfills the queue.
Another aspect of the cluster is that SLURM has a fairshare formula that prioritises jobs based on how much you’ve used before. So if you’re a heavier user, you may be waiting longer. The moral of the story is don’t be greedy. If your job isn’t going anywhere, there probably isn’t much point running it to completion. If you can terminate early, you’ll be saving credits as well as reducing your share of CPU time on the cluster meaning that you may get higher priority later if you need it.
If you can manage checkpointing, resuming and job rescheduling, you might not need to submit 36 hour long jobs. But, don’t submit jobs that are too small, there’s a lot of scheduling overhead that could slow the cluster for other users. It’s probably a bit pointless to run lots of small jobs if they each take less than an hour.
Tip 6: Disk and I/O
There are many storage tiers on the cluster with different quotas, backup options, and access speeds / latency.
The primary storage for models and work is the research data store which is mounted to ~/rds/hpc-work/ and comes with 1Tb of space. You do get a 10% grace over the storage quota for a few days, but don’t rely on this for poor management of your working files. This network file system storage persists after your job is finished. But it has a high latency, and isn't backed up.
The ~/ home directory is regularly backed up, but has a much more limited quota. The /local/ file system on each node provides much lower latency, but doesn't persist after the job.
You can purchase additional storage from this page.
Save space
Firstly, don’t save more than you need. For large models with millions or billions or parameters, each checkpoint that you save can be a few gigabytes. So, if you’ve got a lot of experiments or are running your models for a long time, you can easily eat up all of your hard disk quota.
The first trick is to remove checkpoints after you’ve finished training and testing the model. If you do really need to keep the checkpoints, it may only be worth keeping one or two checkpoints. You probably don’t need to resume training or make predictions from every epoch in the model.
Save time
If you are regularly saving checkpoints, don’t save them too frequently. Disk access can be quite slow and the time spent saving the model state can eat into the time you spend training, meaning that your HPC balance spent on GPU won’t be well used on other things. Choosing an appropriate checkpoint frequency is a balancing act, depending on the size of your model and the length of training.
Caching your features can save time if you have to do a lot of pre-processing for all your instances.
Save files
A common pitfall is to overwrite your old experiments if you re-run your script. A good way to stop clobbering files is to use the SLURM job number in the directory name. Limiting the blast radius to just one experiment.
After your experiements have finished training, you need to think about how to manage your assets. The hpc-work folder you get given has fast access and 1Tb of storage, but this isn't backed up.
Tip 7: Only use versioned code
It is important that all experiements and results can be reproduced: small changes in code can lead to substantial changes in model performance and these need to be identified. There's nothing worse than having different results and not knowing what you've changed that caused the performance to change.
A good way to prevent this from happening is to only use code that is managed in Git to run your experiments. This way, you can always connect your results with an exact version of your code. You can use a library such as gitpython to save the commit hash or tag into your experiments folder. Some libraries, such as HuggingFace, have support for this.
When uploading your code to the HPC, it's imporant to ensure that you don't have any files that are changed but not committed. Part of this requires personal discipline, such as only pulling files from GitHub into your repository. But, if you want to be strict about it, you could check for uncommitted changes before running.
You should also make a log of which libraries you are using, saving these in a requirements file. You can dump everything you're using by running pip freeze and saving the output to a text file.
Tip 8: Log more than you need
In the same vein, logging everything can help you identify what caused errors and contributes to your results. One of the easiet things you can change is to call bash with the -x flag which will echo all commands back, these will get picked up by the log file that SLURM saves. Also, save all the parameters used in the model into a file which you can use later, and also log things like GPU status, just in case thereís any problems that you need to raise to the HPC admins.
bash -x test.sh hello world
+ echo hello
hello
+ echo world
world
To understand whether your parameters are appropriate, and whether your model is diverging, logging the loss and accuracy help. Tools such as tensorboard and visdom can help visualise this. These change quite frequently and there's plenty of tutorials to help you get started with these.
Another sanity check which can save you a lot of time when debugging is to print a sample of the features, validating the preprocessing is working as you expect.
Tip 9: Don't spam the scheduler
Don't submit one job for each hyperparameter choice. SLURM, and most other schedulers support array jobs. This is one job, but with many parts. For example, calling sbatch with --array 1-1000 will create a job with 1000 parts, you can access the ID of the part with an environment variable $SLURM_ARRAY_TASK_ID. This means that you don't need to call the scheduler programmatically. As a rule of thumb, if you're programmatically calling the scheduler to submit jobs, you're probably doing it wrong.
You can find more info about array jobs on the SLURM website: https://slurm.schedmd.com/job_array.html
Tip 10: Automate hyperparamter search, model selection, and reporting
The final point, is don't manually search for hyperparamters. Do it programmatically, this helps reduce your bias and saves you a bunch of time waiting for jobs to finish. This isn't a new problem and if you look around, there's countless frameworks for to do model optimization available. And it's not too difficult to write your own either.
Check out:
To prevent mistakes when copying the results into your thesis or paper, see if you can dump a CSV file or print a pre-formatted latex table as part of your model output.